Build a RAG AI Chatbot with Python, React, and ChromaDB
Build a RAG AI chatbot with Python, FastAPI, React, OpenAI, and ChromaDB for document search, vector retrieval, and grounded AI answers.
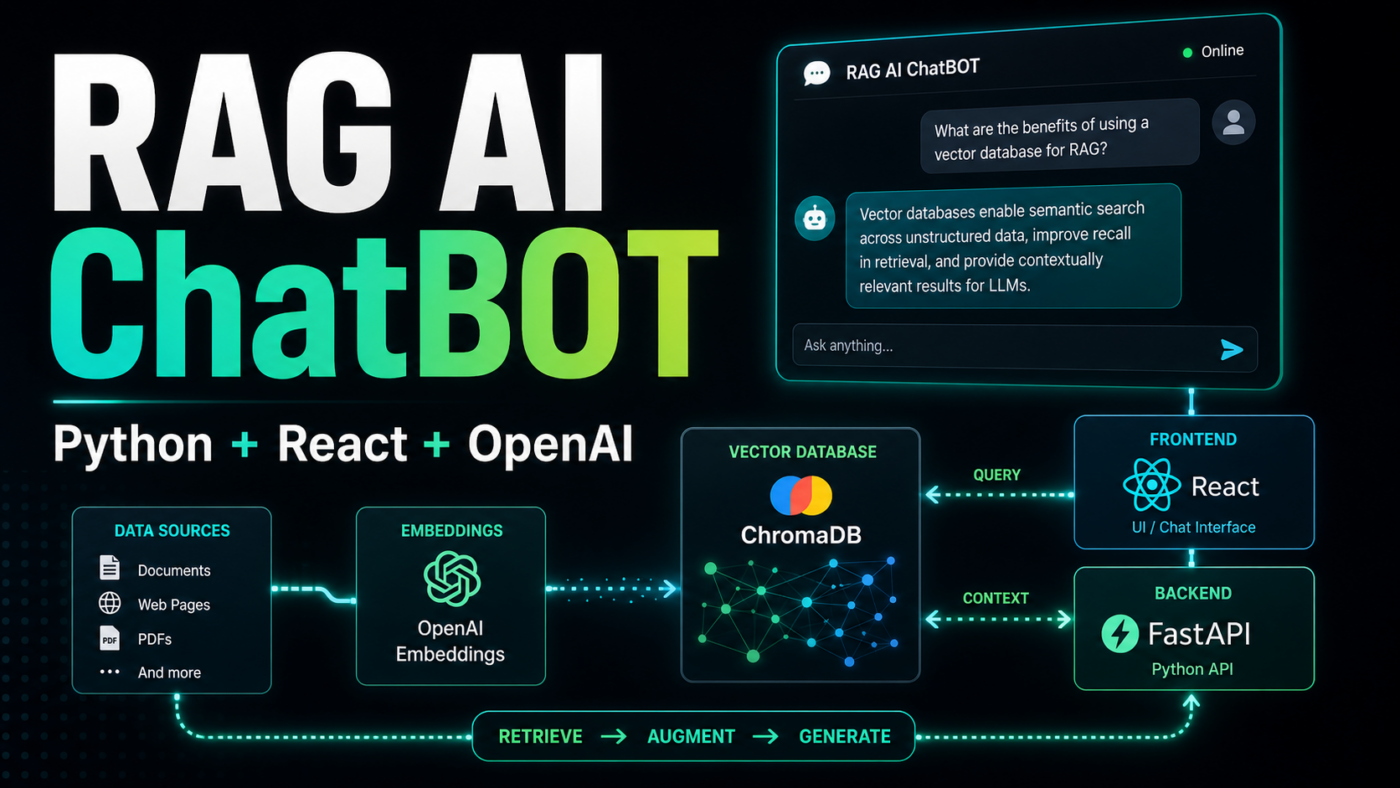
Introduction
If you want to build a RAG AI chatbot with Python, React, and ChromaDB, this tutorial walks through a complete full-stack implementation. The app uses a FastAPI backend, a React frontend, OpenAI embeddings, ChromaDB vector search, and a local knowledge base so the chatbot can answer questions from your own documents.
AI chatbots are becoming an important part of modern business applications. They can answer customer questions, search documentation, support internal teams, qualify leads, and automate repetitive communication.
However, a normal chatbot has one major limitation: it may not know your private business data.
This is where Retrieval-Augmented Generation, also known as RAG, becomes useful.
A RAG chatbot searches your documents first, retrieves the most relevant information, and then generates a response using that context.
Instead of guessing, the chatbot answers based on your own knowledge base.
In this project, I built a complete GitHub-ready RAG AI chatbot using:
- Python 3.12 with pyenv
- FastAPI
- React
- Vite
- OpenAI embeddings
- OpenAI Responses API
- ChromaDB as a local vector database
- A
knowledge.txtfile for sample company documents - A one-command development script to run backend and frontend together
Build a RAG AI Chatbot with Python, React, OpenAI, and ChromaDB
Watch the full project demo on YouTube.
What We Are Building in This RAG AI Chatbot Tutorial
We are building a full-stack AI chatbot application where:
- Sample company documents are stored in
backend/app/documents/knowledge.txt. - The backend splits the document content into smaller chunks.
- Each chunk is converted into an embedding using OpenAI.
- Embeddings are stored in ChromaDB.
- A user asks a question from the React frontend.
- The Python backend searches the most relevant chunks.
- OpenAI generates an answer using the retrieved context.
- The answer is returned to the chatbot UI.
This kind of application is useful for:
- Customer support chatbots
- Internal company assistants
- SaaS help centers
- Documentation search
- AI knowledge bases
- Lead qualification bots
- Product FAQ assistants
Why Use RAG for an AI Chatbot?
RAG stands for Retrieval-Augmented Generation. The basic idea is simple: before the AI model writes an answer, the application retrieves relevant information from your documents and passes that context into the model.
This matters because a normal chatbot may answer from general training data, but a RAG AI chatbot can answer from your own business knowledge. That makes it a better fit for company-specific support, internal operations, onboarding, technical documentation, and private knowledge bases.
A practical RAG chatbot usually needs four core pieces:
- A document source, such as
knowledge.txt, PDFs, help center pages, or database records - An embedding model that converts text into searchable vectors
- A vector database such as ChromaDB to store and search those vectors
- A chat model that uses the retrieved context to generate the final response
In this project, Python and FastAPI handle the RAG pipeline, React handles the chat interface, OpenAI creates embeddings and responses, and ChromaDB stores the local vector index.
RAG AI Chatbot Application Architecture
The application has two main parts.
Backend
The backend handles:
- Loading environment variables
- Reading the
knowledge.txtfile - Splitting content into chunks
- Creating OpenAI embeddings
- Storing vectors in ChromaDB
- Searching relevant context
- Calling OpenAI for final answers
- Returning chatbot responses through FastAPI
Frontend
The React frontend handles:
- Chat interface
- Index Docs button
- User input
- API requests
- Loading states
- Displaying AI responses
RAG AI Chatbot Project Folder Structure
The current GitHub project structure looks like this. Runtime-generated files such as .venv, node_modules, dist, __pycache__, .env, and ChromaDB database files are intentionally ignored.
rag-ai-chatbot/├── .gitignore├── .python-version├── README.md├── backend/│ ├── .env.example│ ├── requirements.txt│ └── app/│ ├── __init__.py│ ├── chroma_telemetry.py│ ├── config.py│ ├── main.py│ ├── rag.py│ └── documents/│ └── knowledge.txt├── frontend/│ ├── index.html│ ├── package.json│ ├── vite.config.js│ └── src/│ ├── App.css│ ├── App.jsx│ └── main.jsx└── scripts/ └── dev.shStep 1 - Clone the RAG AI Chatbot GitHub Repository
Clone the project from GitHub:
$git clone https://github.com/danishashraf047/rag-ai-chatbot.git$cd rag-ai-chatbotStep 2 - Use pyenv for Python 3.12
This project uses pyenv instead of global Python.
The repository includes a .python-version file:
13.12.9Install and select the Python version:
$pyenv install 3.12.9$pyenv local 3.12.9$python --versionExpected Python version:
1Python 3.12.9Step 3 - Create the Virtual Environment
Create a project-level virtual environment:
$python -m venv .venv$source .venv/bin/activateInstall backend dependencies:
$cd backend$../.venv/bin/python -m pip install --upgrade pip$../.venv/bin/pip install -r requirements.txtStep 4 - Add Environment Variables for OpenAI and ChromaDB
Create the backend environment file:
$cp .env.example .envThen add your OpenAI API key:
1OPENAI_API_KEY=your_openai_api_key_here2OPENAI_EMBEDDING_MODEL=text-embedding-3-small3OPENAI_CHAT_MODEL=gpt-4.1-mini4CHROMA_COLLECTION_NAME=rag_chatbot_docs5CHROMA_STORAGE_PATH=./chroma_storage6FRONTEND_ORIGINS=http://localhost:5173,http://127.0.0.1:5173Important: never expose your OpenAI API key in the React frontend. Keep it only in the Python backend.
Step 5 - Understand the Knowledge File for RAG
The project includes a sample company knowledge file:
1backend/app/documents/knowledge.txtThis file contains sample company documents for CodeHills, including:
- Company overview
- Core services
- AI and RAG development process
- Example use cases
- Project timelines
- Pricing approach
- Security and privacy notes
- Deployment and maintenance details
- Frequently asked questions
When you click Index Docs, the backend reads this file, splits it into chunks, creates embeddings, and stores the chunks in ChromaDB.
You can replace this file with your own:
- FAQs
- Product documentation
- Company policies
- Help center articles
- Service descriptions
- Customer support content
Step 6 - Backend Configuration
The backend configuration lives in:
1backend/app/config.pyIt loads environment variables, resolves file paths, configures ChromaDB storage, and supports both frontend origins:
1http://localhost:51732http://127.0.0.1:5173This matters because browsers treat localhost and 127.0.0.1 as different origins.
Step 7 - Build the RAG Logic in Python
The RAG logic lives in:
1backend/app/rag.pyThis file handles:
- OpenAI client setup
- ChromaDB collection setup
- Text chunking
- Embedding generation
- Document indexing
- Context retrieval
- AI answer generation
The backend also includes:
1backend/app/chroma_telemetry.pyThis disables noisy ChromaDB telemetry messages during local development.
How Chunking, Embeddings, and ChromaDB Work Together
The most important part of this RAG AI chatbot is the retrieval pipeline. A document is too large to search and pass into the model as one block, so the backend splits the knowledge file into smaller chunks.
Each chunk is sent to an embedding model. An embedding is a numeric representation of the meaning of the text. ChromaDB stores those embeddings and can compare them against the embedding of a user's question.
For example, if the knowledge file includes service details and a user asks, "Do you build AI automation tools?", the backend embeds that question, searches ChromaDB, and retrieves the most similar chunks. The chat model then receives those chunks as context and writes an answer grounded in the retrieved information.
This approach helps reduce hallucinations because the model is not asked to invent the answer from memory. It is asked to answer from the context returned by the vector search.
Step 8 - Create the FastAPI Backend
The FastAPI app lives in:
1backend/app/main.pyIt provides these routes:
1GET /2GET /health3POST /index4POST /chatThe /index route indexes the knowledge.txt file.
The /chat route accepts a user question, retrieves relevant context, and returns an AI-generated answer.
Step 9 - Build the React Chatbot Frontend
The React app lives in:
1frontend/src/App.jsxThe UI includes:
- A clean chatbot layout
- An Index Docs button
- A message area
- Loading states
- A text input
- A send button
The frontend calls the backend at:
1http://127.0.0.1:8000Step 10 - Run the Python and React RAG Chatbot with One Script
The project includes a helper script:
1scripts/dev.shRun both backend and frontend from the project root:
$./scripts/dev.shThis script:
- Checks for pyenv
- Creates
.venvif missing - Creates
backend/.envif missing - Installs backend dependencies
- Installs frontend dependencies if needed
- Starts FastAPI on port 8000
- Starts Vite React on port 5173
- Stops both servers when you press
Ctrl+C
After running the script, open:
1http://127.0.0.1:5173Backend docs are available at:
1http://127.0.0.1:8000/docsStep 11 - Index Documents in ChromaDB
Open the React app and click:
1Index DocsThis sends a request to:
1POST http://127.0.0.1:8000/indexExpected response:
1{2 "message": "Document indexed successfully",3 "chunks": 74}The exact chunk count may change depending on the content in knowledge.txt.
Step 12 - Ask Questions in the RAG AI Chatbot
After indexing, ask questions based on the content you added inside backend/app/documents/knowledge.txt.
For example, if your knowledge.txt contains company services, ask about services. If it contains product documentation, ask product questions. If it contains policies, ask policy-related questions.
The chatbot retrieves relevant chunks from ChromaDB and sends that context to OpenAI before generating the final answer.
How the RAG AI Chatbot Works Internally
When a user asks a question:
- React sends the question to FastAPI.
- FastAPI converts the question into an embedding.
- ChromaDB searches for similar document chunks.
- The retrieved chunks are added as context.
- OpenAI generates an answer based on that context.
- The response is sent back to the React chatbot UI.
This makes the chatbot more reliable because it answers using your own data instead of relying only on model memory.
Common RAG AI Chatbot Use Cases
Once the basic project works locally, you can adapt the same architecture for several business workflows.
For customer support, the knowledge base can include help center articles, pricing notes, refund policies, onboarding instructions, and troubleshooting guides. The chatbot can answer common questions before a support agent gets involved.
For internal teams, a RAG AI chatbot can search SOPs, HR policies, engineering docs, sales playbooks, or implementation notes. This is especially useful when useful knowledge is spread across long documents and team members need fast answers.
For SaaS products, the chatbot can become a documentation assistant. Users can ask natural-language questions instead of browsing many pages manually, while the backend still grounds answers in approved product content.
RAG AI Chatbot Best Practices
A basic RAG chatbot can work quickly, but production quality depends on careful implementation decisions.
Use clean source documents. Remove duplicate content, outdated answers, and vague notes before indexing. The chatbot can only retrieve what you give it.
Choose chunk sizes carefully. Very small chunks may lose context, while very large chunks may include too much unrelated information. Start with moderate chunks, test real questions, and adjust based on answer quality.
Return source citations when possible. If the answer comes from a specific document, page, or policy, show that source in the UI so users can verify it.
Log failed questions. When users ask something the knowledge base cannot answer, save those gaps so you can improve the source documents and re-index them.
Add authentication for private data. If the chatbot uses internal documents, make sure only authorized users can access the API and frontend.
Production Improvements for a RAG AI Chatbot
This project is a practical starting point. For production, you can add PDF uploads, source citations, authentication, chat history, streaming responses, metadata filters, rate limiting, logging, monitoring, and Docker deployment.
Keep API keys in the backend, re-index documents after changing knowledge.txt, and make sure your frontend origin is included in FRONTEND_ORIGINS.
RAG AI Chatbot FAQ
What is a RAG AI chatbot?
A RAG AI chatbot is a chatbot that retrieves relevant information from documents or databases before generating an answer. RAG helps the chatbot answer from your own knowledge base instead of relying only on general model knowledge.
Why use ChromaDB for this project?
ChromaDB is a simple vector database that works well for local RAG development. It stores document embeddings, searches similar chunks, and lets you build a working Python RAG chatbot without setting up a separate hosted database.
Can I replace `knowledge.txt` with PDFs or website content?
Yes. The current project uses knowledge.txt to keep the tutorial simple, but the same RAG pipeline can index PDFs, documentation pages, help center articles, CRM exports, or database records after you add the right document loader.
Is React required for a RAG chatbot?
No. React is used here because it gives the project a practical web interface. The same FastAPI backend can also power a Next.js app, a mobile app, an internal dashboard, or a Slack-style assistant.
Final Thoughts
When you build a RAG AI chatbot with Python, React, and ChromaDB, you get more than a simple chat UI. You get a practical pattern for turning business documents into searchable AI answers.
With Python, FastAPI, React, OpenAI, and ChromaDB, this project gives you a clean foundation for customer support bots, internal knowledge assistants, SaaS help centers, and documentation search.
Ready to turn this idea into a working system?
Share your goals, workflow, or product challenge. We will review the details and recommend the most practical next step.
In This Article
- Introduction
- What We Are Building in This RAG AI Chatbot Tutorial
- Why Use RAG for an AI Chatbot?
- RAG AI Chatbot Application Architecture
- RAG AI Chatbot Project Folder Structure
- Step 1 - Clone the RAG AI Chatbot GitHub Repository
- Step 2 - Use pyenv for Python 3.12
- Step 3 - Create the Virtual Environment
- Step 4 - Add Environment Variables for OpenAI and ChromaDB
- Step 5 - Understand the Knowledge File for RAG
- Step 6 - Backend Configuration
- Step 7 - Build the RAG Logic in Python
- How Chunking, Embeddings, and ChromaDB Work Together
- Step 8 - Create the FastAPI Backend
- Step 9 - Build the React Chatbot Frontend
- Step 10 - Run the Python and React RAG Chatbot with One Script
- Step 11 - Index Documents in ChromaDB
- Step 12 - Ask Questions in the RAG AI Chatbot
- How the RAG AI Chatbot Works Internally
- Common RAG AI Chatbot Use Cases
- RAG AI Chatbot Best Practices
- Production Improvements for a RAG AI Chatbot
- RAG AI Chatbot FAQ
- Final Thoughts
Discussion
Share your thoughts, questions, or practical experience below.
No comments yet. Be the first to share a thoughtful question or perspective.