WordPress FastCGI Cache: Speed Up Your Nginx Website
Set up WordPress FastCGI Cache on Nginx with practical config examples, bypass rules, cache testing, purge commands, and tuning tips.
Introduction
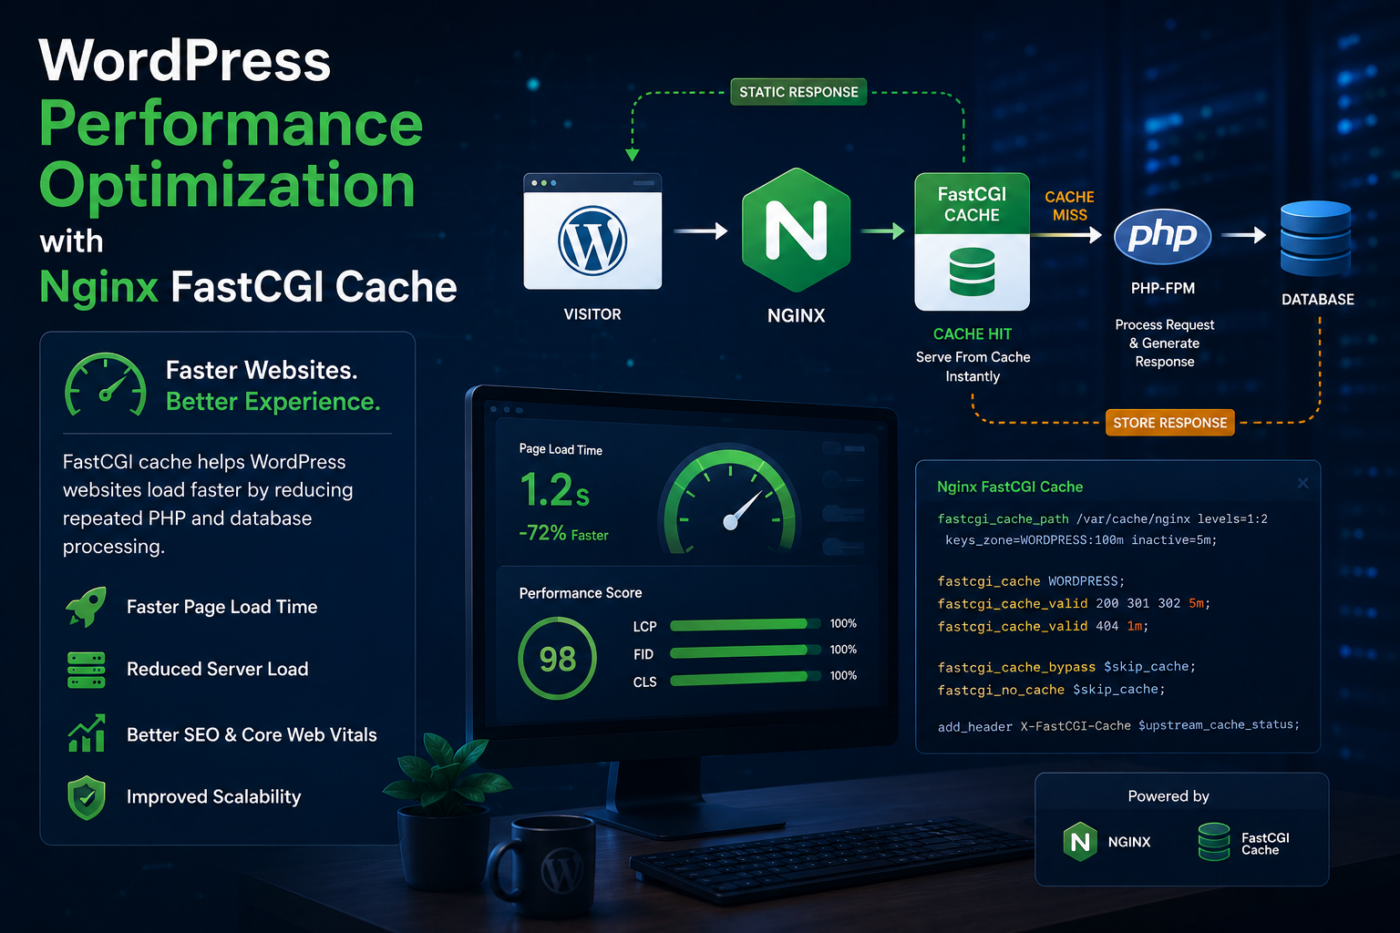
WordPress FastCGI Cache is one of the most effective ways to speed up a WordPress website running on Nginx. Instead of sending every visitor request through WordPress, PHP-FPM, and MySQL, Nginx can serve cached HTML responses directly from the server.
Website performance directly affects user experience, SEO rankings, conversion rates, and overall business growth. For WordPress websites handling growing traffic, relying entirely on PHP and MySQL for every page request can quickly become inefficient.
One of the most effective ways to improve WordPress performance on Nginx servers is by using FastCGI Cache.
FastCGI caching allows Nginx to store generated page responses and serve them instantly without repeatedly processing PHP scripts. This significantly reduces server load and improves response times.
For businesses building scalable digital platforms, e-commerce stores, SaaS products, or AI-powered web applications, WordPress FastCGI Cache creates a strong performance foundation that supports long-term growth.
Why WordPress FastCGI Cache Matters
Faster Page Load Speeds
Instead of generating WordPress pages dynamically for every visitor, Nginx serves cached HTML responses directly.
Benefits include:
- Faster website loading
- Lower TTFB
- Improved Core Web Vitals
- Better mobile performance
Reduced Server Load
WordPress depends heavily on PHP and database queries. Under high traffic, this increases CPU and RAM usage.
FastCGI cache reduces:
- PHP execution
- Database requests
- Server resource consumption
This allows smaller servers to handle more traffic efficiently.
Better SEO and User Experience
Fast websites create better user experiences. They can also improve engagement, reduce bounce rates, and support better search performance.
Google also prioritizes fast-loading websites, making performance optimization an important part of long-term SEO strategy.
Stronger Foundation for AI and Automation
Modern websites often integrate AI chatbots, automation tools, recommendation systems, and API-driven workflows. FastCGI cache helps keep the main website fast while these dynamic systems run in the background.
How WordPress FastCGI Cache Works on Nginx
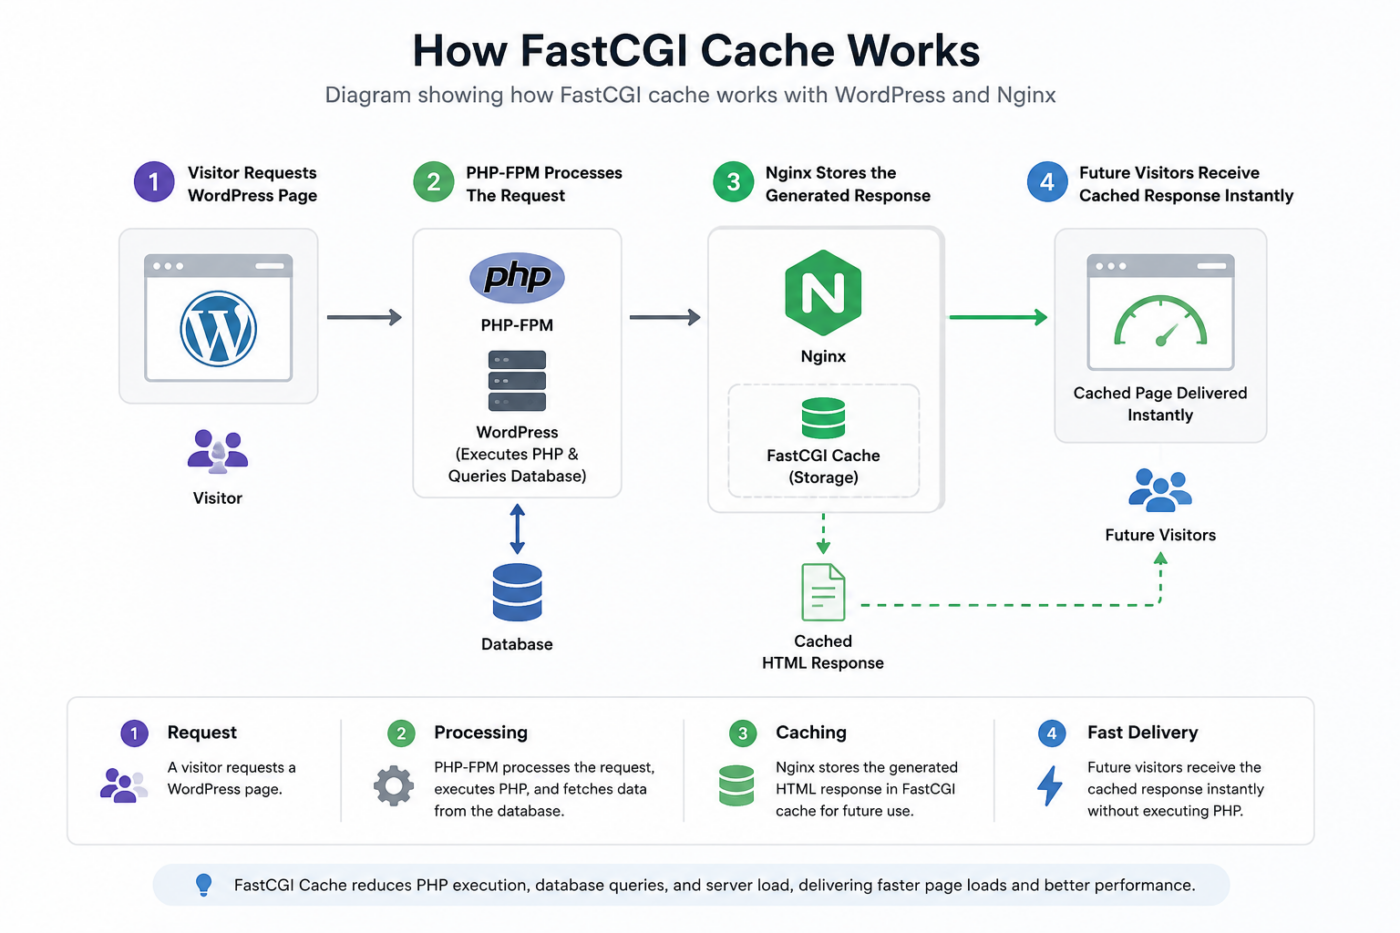
Here’s a simple workflow:
- A visitor requests a WordPress page.
- PHP-FPM processes the request.
- Nginx stores the generated response.
- Future visitors receive the cached version instantly.
Instead of repeatedly generating the same page, the server reuses stored output.
Before You Enable WordPress FastCGI Cache
Before changing Nginx configuration, make sure your server setup is ready:
- WordPress is already running on Nginx.
- PHP-FPM is installed and connected to Nginx.
- You can edit the main Nginx config and the site server block.
- You have SSH access with
sudopermissions. - You can reload Nginx after testing the configuration.
- You know which pages must stay dynamic, such as checkout, account, admin, and logged-in areas.
It is also smart to back up your current Nginx site configuration before editing it. FastCGI cache is powerful, but incorrect bypass rules can cache pages that should remain private or dynamic.
Basic WordPress FastCGI Cache Configuration
Step 1 — Define Cache Path
Add this inside the main http block of your Nginx configuration:
1fastcgi_cache_path /var/cache/nginx/example.com levels=1:2 keys_zone=EXAMPLE_WP:100m inactive=5m use_temp_path=off;What This Means
keys_zone=EXAMPLE_WP:100mallocates memory for cache metadata.inactive=5mremoves cached files that are not accessed within 5 minutes.levels=1:2organizes cached files efficiently on disk.use_temp_path=offwrites cache files directly to the cache path.
Step 2 — Enable Cache Inside Your WordPress PHP Block
Inside your WordPress PHP location block, add:
1fastcgi_cache EXAMPLE_WP;2fastcgi_cache_valid 200 301 302 5m;3fastcgi_cache_valid 404 1m;What This Does
- Caches successful responses for 5 minutes.
- Caches redirects for 5 minutes.
- Caches 404 pages for 1 minute.
- Reduces repeated PHP and database processing.
Step 3 — Add Cache Bypass Rules
You should avoid caching admin pages, logged-in sessions, POST requests, and dynamic URLs.
1set $skip_cache 0;2 3if ($request_method = POST) {4 set $skip_cache 1;5}6 7if ($query_string != "") {8 set $skip_cache 1;9}10 11if ($request_uri ~* "/wp-admin/|/xmlrpc.php|wp-.*.php|/feed/|index.php") {12 set $skip_cache 1;13}14 15if ($http_cookie ~* "comment_author|wordpress_[a-f0-9]+|wp-postpass|wordpress_logged_in") {16 set $skip_cache 1;17}Then apply the bypass condition:
1fastcgi_cache_bypass $skip_cache;2fastcgi_no_cache $skip_cache;This ensures dynamic or authenticated sessions are not cached incorrectly.
Step 4 — Add Common WordPress Cache Bypass Paths
Many WordPress websites also need special handling for carts, checkout pages, account pages, search pages, previews, and REST API requests. These URLs often depend on user-specific state or real-time data.
1if ($request_uri ~* "/cart/|/checkout/|/my-account/|/wc-api/|/wp-json/|preview=true") {2 set $skip_cache 1;3}4 5if ($request_uri ~* "s=") {6 set $skip_cache 1;7}For a brochure website or content blog, your bypass rules may be simple. For WooCommerce, membership websites, learning platforms, or dashboards, bypass rules are more important because each visitor may see different content.
Step 5 — Add Cache Status Header
This header helps you confirm whether a page is served from cache.
1add_header X-FastCGI-Cache $upstream_cache_status;Possible results:
HITmeans the page was served from cache.MISSmeans the page was not found in cache.BYPASSmeans cache was skipped intentionally.EXPIREDmeans the cached page expired and was regenerated.
Recommended WordPress FastCGI Cache Settings
The best cache settings depend on your website type, update frequency, and amount of dynamic content.
For a content blog or marketing website, a 5 to 15 minute cache duration is usually a practical starting point. It gives visitors fast pages while keeping content reasonably fresh after updates.
For a news website, you may want shorter cache times on homepage and archive pages because new content appears often.
For WooCommerce, cache public product and category pages carefully, but bypass cart, checkout, account pages, and logged-in sessions. Product stock, pricing, and customer-specific notices may require extra testing.
For high-traffic landing pages, FastCGI cache can provide a major performance improvement because many visitors request the same static page. In this case, longer cache durations can work well if your deployment process purges cache after updates.
FastCGI Cache vs WordPress Cache Plugins
WordPress cache plugins can be useful, especially on shared hosting or Apache-based environments. However, WordPress FastCGI Cache works at the Nginx server level, before WordPress fully loads.
That server-level position gives FastCGI cache several advantages:
- Nginx can serve cached pages without booting WordPress.
- PHP-FPM handles fewer repeated requests.
- MySQL receives fewer duplicate queries.
- TTFB often improves because cached HTML is returned quickly.
- Server resources stay more stable during traffic spikes.
Cache plugins may still help with page optimization, minification, image handling, CDN integration, or cache purging workflows. In many Nginx setups, the best approach is FastCGI cache for full-page caching and carefully selected plugins for frontend optimization.
Useful Server Commands
Check Nginx Configuration
$sudo nginx -tReload Nginx
$sudo systemctl reload nginxRestart Nginx
$sudo systemctl restart nginxCheck Website Cache Header
$curl -I https://example.comYou should look for a response like this:
1X-FastCGI-Cache: HITPurge FastCGI Cache Manually
$sudo rm -rf /var/cache/nginx/example.com/*Monitor Nginx Logs
$sudo tail -f /var/log/nginx/access.logMonitor Nginx Error Logs
$sudo tail -f /var/log/nginx/error.logCheck PHP-FPM Status
$sudo systemctl status php8.2-fpmRestart PHP-FPM
$sudo systemctl restart php8.2-fpmReplace php8.2-fpm with your installed PHP-FPM version if needed.
Practical Example
Imagine an e-commerce website receiving thousands of daily visitors.
Without caching:
- Every visitor triggers PHP execution.
- Database queries run repeatedly.
- Server resources increase under traffic.
- Pages load slower during peak hours.
With FastCGI cache:
- Product and content pages load faster.
- CPU usage decreases.
- The server handles more concurrent users.
- User experience improves significantly.
Depending on server setup and website optimization, cached pages can often load much faster than fully dynamic pages.
How to Test WordPress FastCGI Cache Properly
Testing is important because a cache configuration can look correct but still bypass requests because of cookies, query strings, headers, or Nginx location rules.
Start by requesting the homepage twice:
$curl -I https://example.com$curl -I https://example.comThe first request may return MISS, and the second request should usually return HIT.
Then test a page that should not be cached:
$curl -I https://example.com/wp-admin/For dynamic pages, you want to see BYPASS or no cache hit. If an admin, cart, checkout, account, preview, or logged-in page returns HIT, review your bypass rules before using the configuration in production.
You can also test with a query string:
$curl -I "https://example.com/?test=1"If your bypass rule skips query strings, this request should not be served from cache.
Cache Purging Options
Manual cache purging is useful during development, but production websites usually need a more reliable purge workflow.
Common purge options include:
- Purge the cache manually with a server command.
- Purge cache during deployment.
- Purge cache after publishing or updating WordPress content.
- Use a WordPress plugin that can send Nginx purge requests.
- Use short cache durations when content changes often.
For smaller websites, a 5 to 15 minute cache duration may be enough. For larger publishing workflows, connect cache purging to content updates so editors do not have to wait for stale pages to expire.
Security and Reliability Notes
WordPress FastCGI Cache should improve performance without exposing private data. The safest approach is to cache only public pages and bypass anything personalized.
Be careful with:
- Logged-in user cookies
- Preview URLs
- Password-protected posts
- WooCommerce carts and checkouts
- Membership content
- Admin pages
- Form submissions
- REST API responses that include private data
After enabling cache, test as a logged-out visitor and as a logged-in user. If your website has WooCommerce or memberships, place test orders and check account pages before relying on the configuration.
Common Mistakes to Avoid
Caching Logged-In Users
Never cache:
- WordPress admin pages
- WooCommerce cart pages
- WooCommerce checkout pages
- My Account pages
- Membership dashboards
- Logged-in user sessions
Caching these pages can show incorrect user-specific content.
Not Purging Cache After Updates
If cache is not cleared after content or design updates, visitors may continue seeing outdated pages.
Overly Long Cache Expiry
Very long cache durations can improve speed but reduce content freshness. For many WordPress websites, 5 to 15 minutes is a practical starting point.
Ignoring Mobile Optimization
Caching improves server response time, but it does not replace proper frontend optimization.
You should also use:
- Image compression
- Lazy loading
- Responsive design
- CDN delivery
- Optimized CSS and JavaScript
Weak PHP-FPM Configuration
FastCGI cache reduces PHP load, but PHP-FPM still needs proper tuning for uncached and dynamic requests.
Forgetting to Test Logged-Out and Logged-In States
A common mistake is testing only as an admin user or only as a logged-out visitor. Test both states because logged-in cookies should bypass cache while public visitors should receive cached pages.
Caching Search and Filter Results Incorrectly
Search pages, filtered archives, and faceted navigation can generate many unique URLs. Decide whether those pages should be cached, bypassed, or handled with a shorter cache duration.
WordPress FastCGI Cache FAQ
What is FastCGI cache?
FastCGI cache stores generated PHP responses as static content so Nginx can serve pages without executing PHP every time. For WordPress, this means public pages can load faster because Nginx can return cached HTML directly.
Is FastCGI cache better than WordPress cache plugins?
In many cases, yes. Server-level caching is usually faster because it works before WordPress and PHP are fully loaded.
Can FastCGI cache work with WooCommerce?
Yes, but cart, checkout, account, and logged-in pages must bypass cache properly.
How long should FastCGI cache last?
It depends on the website. A 5 to 15 minute cache duration is often a good balance between speed and freshness.
Does WordPress FastCGI Cache improve Core Web Vitals?
It can help, especially by improving server response time and TTFB. However, Core Web Vitals also depend on images, CSS, JavaScript, fonts, layout stability, and frontend performance.
Should I use FastCGI cache with a CDN?
Yes, in many setups. FastCGI cache speeds up origin server responses, while a CDN can cache and deliver assets or pages closer to visitors. Test the cache headers carefully so the CDN and Nginx cache do not conflict.
Is FastCGI cache safe for membership websites?
It can be safe only with strict bypass rules. Membership dashboards, account pages, protected content, and logged-in sessions should not be cached as public pages.
How can I confirm FastCGI cache is working?
Use this command:
$curl -I https://example.comThen check for:
1X-FastCGI-Cache: HITFinal Thoughts
WordPress FastCGI Cache is one of the most effective ways to improve WordPress performance on Nginx. It reduces server load, improves page speed, lowers repeated PHP work, and creates a scalable foundation for growing websites.
When configured carefully, it can help businesses deliver faster digital experiences while reducing infrastructure strain.
At CodeHills, we help businesses optimize WordPress infrastructure, backend systems, cloud environments, and AI-powered digital platforms for long-term scalability and performance. Whether you are scaling a content platform, SaaS product, or high-traffic business website, efficient server architecture plays a critical role in sustainable growth.
Ready to turn this idea into a working system?
Share your goals, workflow, or product challenge. We will review the details and recommend the most practical next step.
In This Article
- Introduction
- Why WordPress FastCGI Cache Matters
- How WordPress FastCGI Cache Works on Nginx
- Before You Enable WordPress FastCGI Cache
- Basic WordPress FastCGI Cache Configuration
- Recommended WordPress FastCGI Cache Settings
- FastCGI Cache vs WordPress Cache Plugins
- Useful Server Commands
- Practical Example
- How to Test WordPress FastCGI Cache Properly
- Cache Purging Options
- Security and Reliability Notes
- Common Mistakes to Avoid
- WordPress FastCGI Cache FAQ
- Final Thoughts
Discussion
Share your thoughts, questions, or practical experience below.
No comments yet. Be the first to share a thoughtful question or perspective.